 Landing an aeroplane is potentially one of the trickiest aspects of flying and, if you get it right, one of the most rewarding. However, most of us learn to land through repetition and experience – I wonder how many countless ‘circuits and bumps’ I have done in my life, practising landings in all kinds of wind and weather… and still I get the occasional one wrong and end up going around.
What if you could land an aeroplane every time, right on the spot you picked? And had a process you could use which works on any type of aircraft?
 Enter David Jacobson – discoverer/designer/inventor of the ‘Jacobson Flare‘* – a way to land an aircraft, based on simple mathematics. I first met David a few months ago when we were both making aviation related presentations at Box Hill Institute near Melbourne. And I must confess, not being much of a mathematician, I just could not follow David’s logic. All his references to angles and aim points left my head spinning and, because most of what he said seemed to be directed at pilots of passenger jets, I (wrongly) assumed it had no application to something as small and simple as an A22LS Foxbat. After his presentation, David asked me what I thought about his approach(!) to landing and I told him I hadn’t a clue.
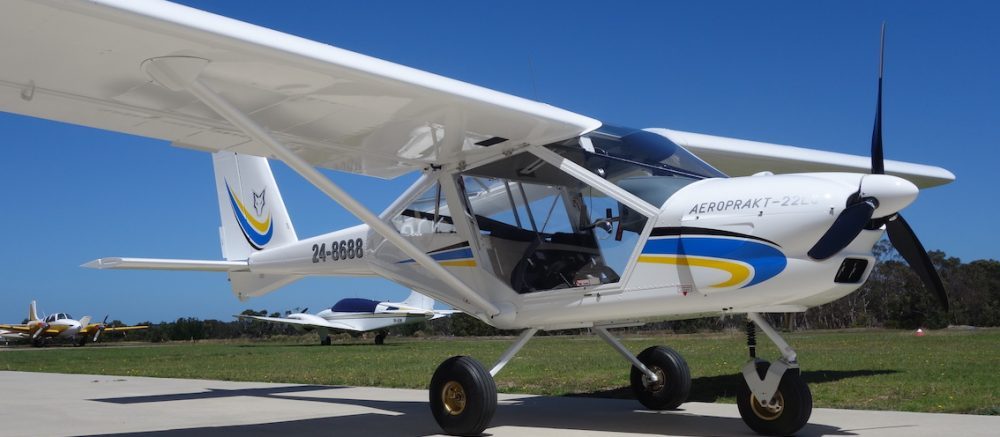
Roll on a couple of months and David was kind enough to pay a visit to Foxbat Central at Tyabb Airport and take us – me and my Foxbat colleague Ido Segev, and friends Mike Rudd and Ross Porz – through the theory and practice of his Jacobson Flare. As it turns out, the Jacobson Flare is much simpler than I thought, consisting of (a) determining an aim point along the runway (based on approach angle, aircraft size/type etc), and (b) determining a flare point by coming back towards the threshold a further, aircraft based, distance. Although the maths behind it can seem incomprehensible (at least to me) the end result is very straightforward. I had already taken the precaution of loading David’s app on my iPad, and with a very short introduction, I was soon calculating aim points and flare points for all kinds of aircraft, including the A22LS Foxbat and A32 Vixxen – the process will work for anything from an A380 to a sailplane!
Before we go any further, on David’s advice, I have to slaughter one of aviation’s most sacred cows – that on approach to land, you control descent with throttle and speed with elevator – if you want to slow your descent, add throttle; if you want to add speed, push the nose down. This was drummed into me right from the start (is it was for David too, initially) and, generally speaking, it is an approach I have used all my life. David firmly believes this is complete rubbish on modern aircraft because it’s utilising the secondary effects of the controls. He unequivocally states you should use elevator to hold the aircraft pointing at your aim point and use the throttle to keep the speed in the required zone – thus utilising the primary effects of the controls. Once you get the old height/throttle – speed/elevator combo out of your mind (no easy task), the rest quickly falls into place. Indeed, this is how an ILS approach is flown and has been the mainstay of civil and military aircraft for decades.
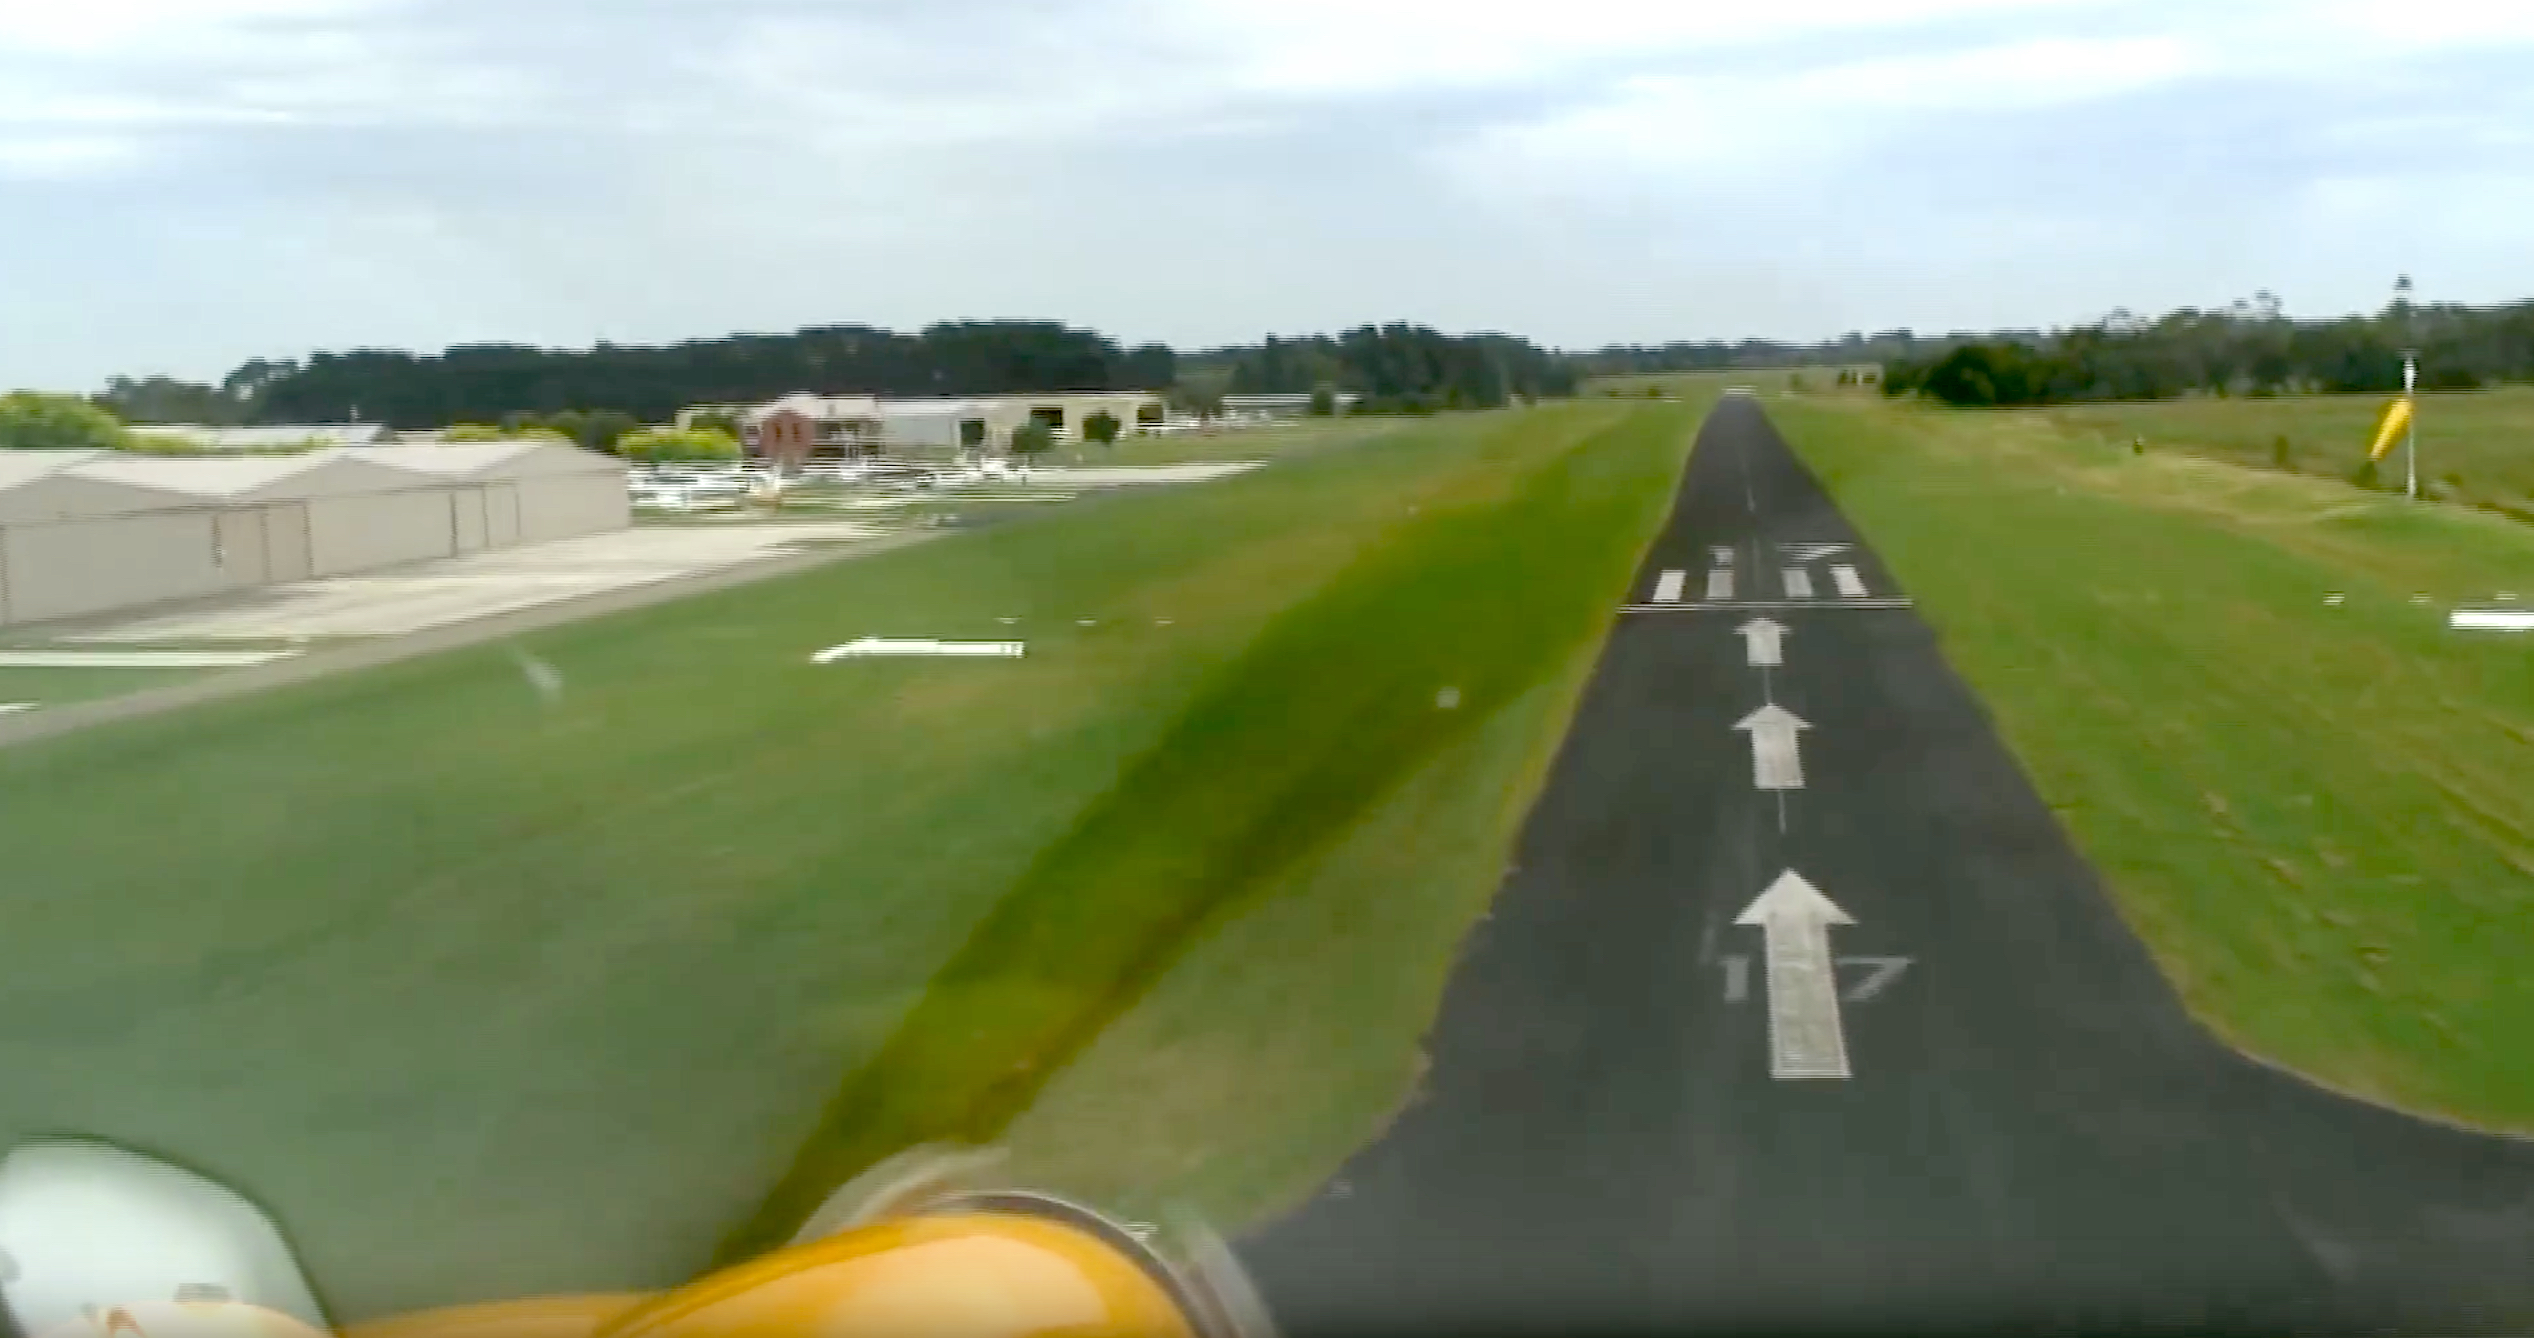
Next, many bitumen runways have ready-made length markers painted on the runway. At most major airports (but certainly not all) the ‘keys’ are 100 feet long (about 30 metres) and the centre lines are each 100 feet long, with 100 foot spaces in between them. In these cases, it’s easy to calculate lengths along the runway from the threshold.
Here in simple terms are the distance points for the A22LS Foxbat and A32 Vixxen (there are slight differences between them but small enough to ignore at this stage). These figures assume a main wheels height of about 10 feet above the ground at the runway threshold and the pilot’s eye height above the wheels of between 4.5 and 5 feet:

1. Work out where in the aircraft windscreen the horizon line lies in straight & level flight. This is the height of the pilot’s eyes above the glare shield where it meets the windscreen. Either make a clear mental picture, or find some, non-permanent, way of marking the line on the windscreen. Tip: get a thin strip of white sticky tape and lay it on top of the instrument binnacle so it reflects in the windscreen, move the tape backwards or forwards until it coincides with the horizon in straight & level flight. Another way is to use white tape to mark one or both of the diagonal struts inside the A22LS windscreen. This line becomes your main reference marker for your initial aim point.
2. On final approach, line up your reference marker with an aim point about 60 metres down the runway from the threshold. Using elevator, keep the reference mark lined up with this aim point. Maintain 50 knots with throttle. Note: this is just your aim point, it is also the point of intended touchdown.
3. Determine a flare point about 20 metres closer to you than your aim point – ie about 40 metres down the runway from the threshold. Together with the pilot’s line of sight towards the aim point, the flare point creates a visual fix. In other words, the flare point is visible, rather than being a guess of height. When this point disappears from your sight below the glare shield, reduce power to idle if needed and begin a 4-second flare to land. An easy way to do this is to raise your eyes from the windscreen/instrument panel joint towards the far end of the runway and gently pull back on the elevator as you do so, mentally counting 1001 – 1002 – 1003 – 1004. The wheels should touch down on the count of 1004 about 60-100 metres from the runway threshold at a speed of about 35-40 knots. Hold off the nose wheel as long as possible and gently brake to walking pace before exiting the runway.
There are a few provisos:
– these figures only apply to A22LS and A32 Vixxen aircraft. Different aircraft will have different aim point and flare distances!
– if the runway has painted lines, be sure you know how long they are before using them for your calculations! For example, at Tyabb the distance between the start of the keys and the top of the runway heading numbers is 100 feet – about 30 metres.
– if there are no distance markers on the runway – for example if it’s a grass or dirt strip – you’re going to have to estimate aim and flare points based on experience. If it’s your own strip, you can white-paint rocks or other solid objects and place them to each side of the runway at the measured distances.
– it doesn’t matter whether you use flap or not, using this process the aim and flare distance points are the same.
– the distances in 1-3 above assume a 4 degree approach angle and no obstructions at the approach end of the runway. A sharper angle of approach will reduce the figures.
– this system applies to landings on runways which are level r have an up or down slope; if you can follow the maths, the aim and flare points remain the same.
– distances will change if you want to achieve a very short landing or want to 3-point a tail dragger.
– crosswind landings are easily accommodated.
– runway width is no longer a distracting factor, as you are not just relying on a guess of flare height.
We don’t currently have a Foxbat or Vixxen demonstrator, so I have only been able to try this system on a Glasair Sportsman. In three landings it was starting to work OK – even though the aircraft is a taildragger, so it has somewhat different distances from the Foxbat for aim and flare points. Hopefully, we will be able to try it on an A22 and/or A32 soon and will report back.
Meanwhile, if you own a Foxbat or Vixxen, give it a try – I’d be very interested to hear/read your feedback.
*The Jacobson Flare has been demonstrated, since 1985, to work well on a wide range of aircraft. Full details can be found in the Jacobson Flare App in App stores. Many thanks to David for his patience in talking to the mathematically unwashed! For more information, click here to see the Jacobson Flare website.
I feel a lot better now knowing the worlds best Foxbat pilot couldn’t understand the technicalities of the Jacobson flare,I purchased it some time ago but I couldnt get a handle on it at all,the maths of it were pretty well double Dutch and typical EXPERT confusion. I am delighted with your explanation and if the wind is good tomorrow I can’t wait to try it,I will let you know.
Thanks for the tips Pete
Phil Ward
Hi Phil,
Sorry to hear that you remain somewhat confused. It is really important to me that you understand the principles, if not the maths (you don’t necessarily need to understand them, although it is very simple, really – and I am no mathematician, either!)
Much more information can be sourced from http://www.jacobsonflare.com and the full explanation is available on the Jacobson Flare app, which you already have. Thank you for your interest.
You are most welcome to contact me on david.jacobson@jacobsonflare.com or +61 419 346 336, to discuss. I shall be happy to guide you through the app, to locate the stuff that you want understand, in a most informal way.
Kind regards,
David Jacobson
Hi Peter. I like new explanations and it makes the subject interesting but it’s a tricky thing to unpick your own hard learned technique. To me, landing my Foxy is all about the picture and the numbers. I am a farm grass strip user and visualising the reference points at my strip or other short fields could be a little difficult. When I land, I try to nail the reference speed, in my case 52Knts on final, 48Knts over the fence, lined up on the centre of the strip. If there is a crosswind that would be with a low wing and crossed controls to slip into the crosswind. In a strong crosswind I will add some speed. Then it is all about resolving “the picture”. This is the magic of the human being because the height above the strip is a perception, peripheral vision sensing the point at which my attention turns to the end of the strip and easing the yoke back to keep that spinner on the horizon. A trickle of power will arrest things if the process is happening a bit fast. Hopefully, on a good day, I will lightly nudge the earth upon my return, not always but it’s not usual for me to arrive with too big a bump (tempting fate?) and I look forward to my passenger saying “nice one”. It’s not always possible to counter all the vagaries of local conditions and it pays to stay on top of “the picture” and “the numbers” and be ready with the throttle if it all starts to unravel. When all said, not wishing to be a naysayer I will see whether I can learn anything from http://www.jacobsonflare.com/. Thanks, James Pearce UK.
Hello James,
The time-honoured methods you describe are commonly used throughout the world. Unfortunately, they are hand-me-downs from around the end of World War 1, in 1918. Everything in aviation has moved on – except landing training technique.
The Jacobson Flare is the world’s first and only universal, quantifiable and consistent approach and landing flare training technique.
Much more information can be sourced from http://www.jacobsonflare.com and the full explanation is available on the Jacobson Flare app for iPad, on the iTunes App Store.
You are most welcome to contact me on david.jacobson@jacobsonflare.com or +61 419 346 336, to discuss.
Kind regards,
David Jacobson
Pete, this sounds exactly they way I was taught to land a Jet provost in the 70s. 105 knots at the end of the downwind leg, then 65% power in a continuous turn until lined up on “finals” at about 300′. There is nothing I can recall about stick for speed and throttle for rate of descent. I only learned that later flying the PA28 and from “Stick and Rudder”.
As soon as we had a view of the aiming point we kept the nose on it and controlled airspeed with throttle. To build in a bit of anticipation, (always a good thing) there was a technique were we assumed a string from the thottle to the joystick via a harness D ring. Stick goes forward, string pulls throttle back and vice versa.
There again, in those days you were expected to land on the keys, not somewhere down the runway. Sadly I cannot try it on the Foxbat as those Brexit drongoes had dented my finances.
Great site.
Phill
Hi Phil,
Your original training in the Jet Provost was correct, but there is more to be added: your latter training on the PA28 was likely from an instructor who had swallowed, without question, what he had been told by HIS instructor and so on, right back to 1918.
Stick and Rudder is a great book – an acknowledged classic, but it, too, misses a couple of key points.
When power/thrust is fixed (such as in a glide with a reduced, yet fixed power setting – or on take-off power, just airborne), it is, of course, necessary to pitch with the elevators to control airspeed. And originally and for many years further, glide approaches were the norm, into all-over fields and aerodromes. It made sense, then, with light traffic and very unreliable engines, for every approach was a potential forced landing.
After World War 2, with sealed or un-sealed runways of limited length and with aeroplanes becoming larger, heavier faster and more reliable, it became necessary to fly a stabilised approach to a suitable aim point. To achieve this consistent constant angle / constant speed approach path, it is necessary to fly accurately, using the primary, not the secondary effect of controls (elevator and throttle). Otherwise, the flight path is a roller coaster, nothing is stable and the aeroplane will never cross the threshold at the same height, twice. This makes consistently smooth landings very difficult and touchdown points quite random, as you have noted.
Then comes the flare. We have ALL been falsely conditioned by the depiction of the approach path angle by our instructors – in text books, on black- and white-boards, computers and pen and ink. The path angle is generally depicted between 20-30 degrees, when we all know it to be 3-4 degrees. This has masked the reality.
Drawing the diagram accurately, at the correct path angle, would have revealed that 3 degrees is approximately 1:20; 4 degrees approximately 1:15 and this is significant as any error in the guess of vertical flare height compounds 20 or15 times, respectively, up or down the runway.
Now, triangles have had 3 sides for a very long time and we only used 2 of them: the hypotenuse for the pilot’s eye path and the opposite (vertical) side for flare height. Nobody else, it appears, thought of utilising the 20:1 advantage of the adjacent, third side. It’s the centreline and it’s fully visible. Any error made in estimating longitudinal distance along the runway REDUCES 20 times, vertically. This provides great tolerance of error, especially when applied on grass and gravel airstrips.
When the aeroplane arrives at the correct flare height, while being aimed, accurately, at the correct aim point, the junction of the glare shield with the base of the windscreen (used for consistency between types) will be just overtaking / eclipsing a particular point on the centreline. That point can be easily determined in advance and then used to form a visual fix, just as the 1943 ‘Dambusters’ of 617 San, RAF applied (with their spotlights to fix their height over water, at night and their simple Y-shaped bombsight).
When combined with a timed, 4-sec flare to a new, second aim point, this time usually at the runway end, together with the accurate, stabilised approach, the entire framework defines a consistent, predictable and fully visible approach and landing eye path for the pilot.
This is the very basis of the Jacobson Flare. Universal. Quantifiable. Consistent.
Much more information can be sourced from http://www.jacobsonflare.com and the full explanation is available on the Jacobson Flare app for iPad, on the iTunes App Store.
You are most welcome to contact me on david.jacobson@jacobsonflare.com or +61 419 346 336, to discuss.
Kind regards,
David Jacobson
really interesting post!
Kind regards,
Warren Butler
New Zealand
I was taught to control glide slope with elevator and speed with throttle after I started in larger aircraft and still use this method with my Foxbat.
Interesting to read this method has a name (Jacobsen Flare)
Geoff Robinson
Hi Geoff,
The ‘Jacobson Flare’ is the complete explanation of the 5 essential elements for making consistent landings, in any fixed-wing aeroplane that flares:
1. Where to aim;
2. How to aim;
3.When to flare;
4. How much to flare; and
5. How fast to flare; i.e., the flare rate.
As a consequence it remains the world’s first and only universal, quantifiable and consistent approach and landing training technique.
From the above, you can see that your adopted (and correct) technique, using the primary effects of controls, is just one of the 5 elements. The COMBINATION of all 5 is what creates the consistency and the adaptability to any aeroplane. Much more information can be sourced from http://www.jacobsonflare.com
You are most welcome to contact me on david.jacobson@jacobsonflare.com or 0419 346 336, to discuss.
Kind regards,
David Jacobson
I guess I usually do it by ‘the picture’ and I am not over-interested in the maths side of the story. However, gave it a go on my farm strip today just to see. Had a moderate crosswind and a bit of mechanical turbulence coming up over the hill so it was not that easy to stay stable all the way down. Nonetheless we dropped on just 8 metres past the aiming point with the nose wheel off for another 15 or so. Probably one of my better efforts so I will persevere.
Who knows – perhaps if this works out I might even be brave enough to land down-hill over my trees!
Thanks Peter.
Hi Norm,
It sounds like you are on the right track. The maths are not essential in applying the JF.
You are most welcome to contact me on david.jacobson@jacobsonflare.com or 0419 346 336, to discuss.
Kind regards,
David Jacobson