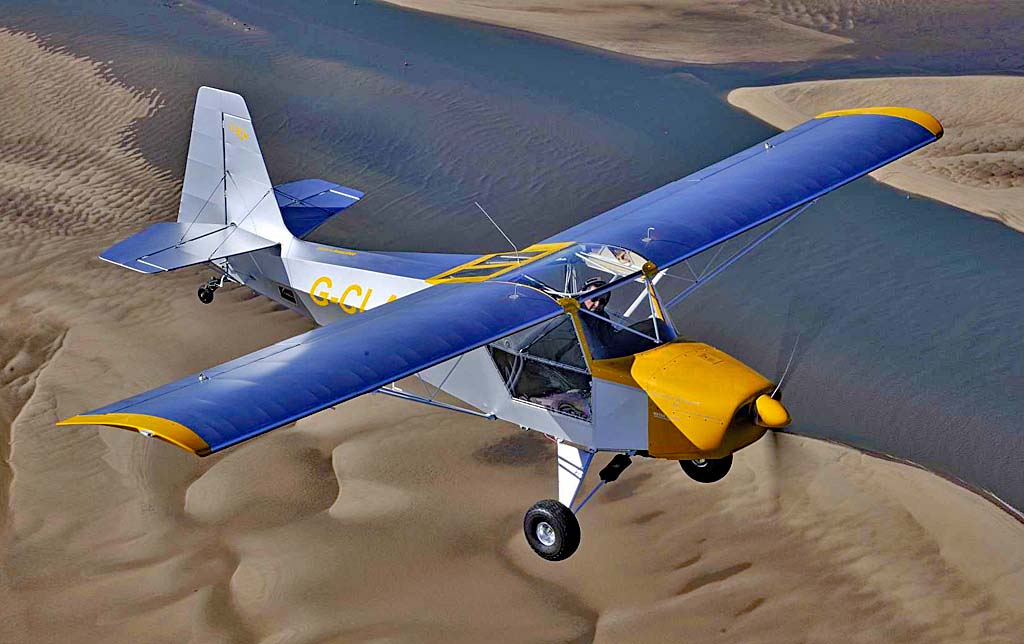
Sherwood Scout

Sherwood Scout

A couple of years ago I visited the UK Light Aircraft Company (TLAC) factory in Norfolk to look at the single-seat tail-dragger Sherwood KUB aircraft. At the time I noted the high degree of engineering professionalism at the factory and very nearly decided to become the Australian dealer for the KUB. However, when we worked out prices, the A$ vs UK£ exchange rate put an end to my plans. I believed that the retail price for the KUB – great little aeroplane though it is – would not attract many buyers.
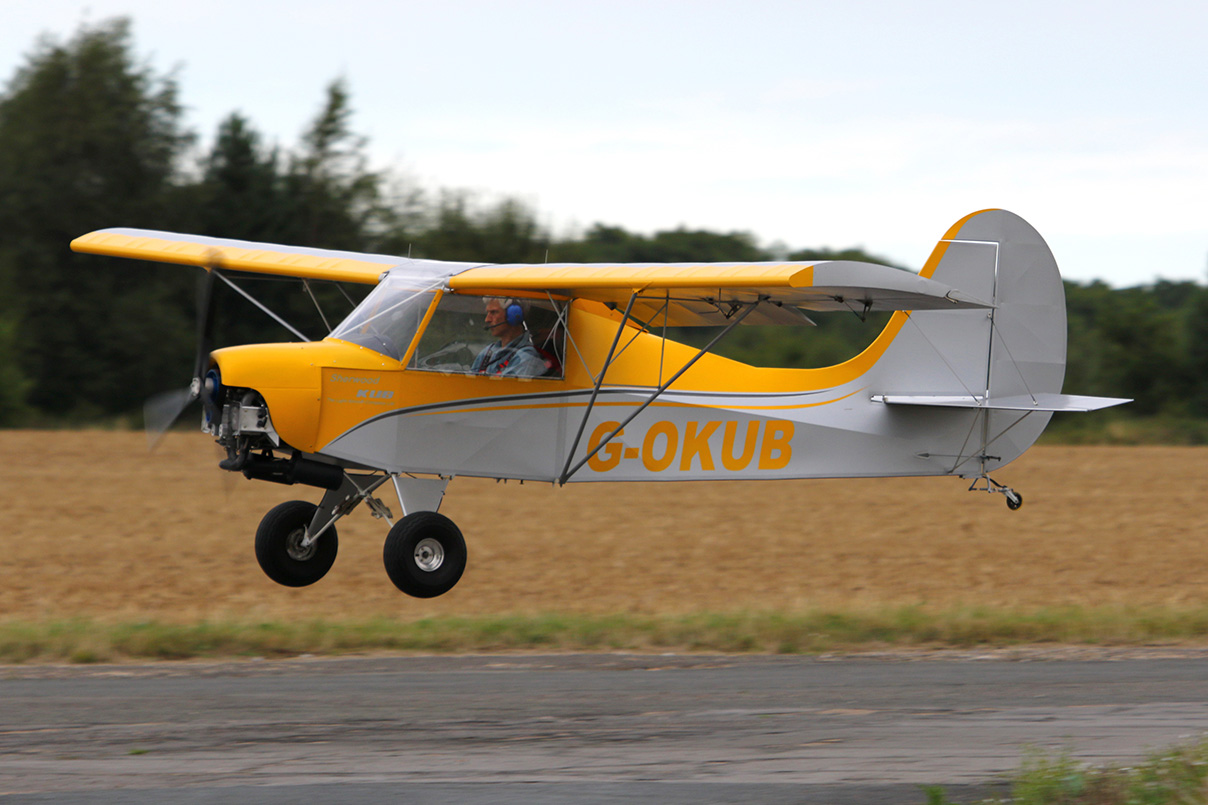
Sherwood KUB

While I was at the factory, I also looked at the Sherwood Scout, a 2-seat high wing Rotax 912ULS powered tail dragger. This aircraft, if you go back far enough, has its history in the Kitfox, although now seriously re-engineered to be stronger and fly (much) better than the older design. Apart from the excellent standard of engineering in the manufacture of this aircraft, it is almost unique both in being covered with UV-proof Oratex and having a (very) easy folding wing, allowing it to be stored in about 25% of the space needed for a fixed wing aircraft.

The aircraft is not the proverbial ‘tube & sailcloth’ aircraft but has a welded 4130 tube fuselage with aluminium spars and wooden ribs.  With the Rotax 912ULS/100hp engine, its performance figures are very attractive too. As well as the easy folding wing, add side-by-side seating, a good weight carrying capability, a genuine 95 knots TAS and you have the makings of an excellent bush plane – some might say it would eat Big Cats for breakfast! You can even swap between nose dragging and tail dragging in a better of minutes…

I am an avid subscriber to ByDanJohnson’s Blog – his is one of the top websites covering Light Sport and Recreational aircraft worldwide. And just the other day, one of his contributors, the well-known Dave Unwin,  published a flight review of the Scout. Once again, my interest was piqued…

Apart from commenting on the ‘very honest’ flying characteristics – ie very good! – the reviewer also reminded me of the easy folding wing option, making the aircraft much easier to store. Here’s his summary:

“I honestly feel that TLAC has got a winner here! Obviously care needs to be taken with the weight and balance of the lightest version, but with a typical useful load in excess of 517 pounds [235 kgs] the larger Scout [vs KUB] is a very practical machine, with good numbers for speed, range and endurance, and the ability to carry a good load into and out of rather short strips. The folding wings are a big plus, while the ability to reconfigure from a nosewheel to a tailwheel quickly and easily could also be very useful. I liked it, a lot.

You can read the full article here: Review of the Sherwood Scout

What do you think?

5 easy steps to change your Foxbat oil

Here’s how to change the oil and filter on your Aeroprakt A22LS Foxbat or A32 Vixxen Rotax 912ULS engine:

1. Prepare for your oil change.
Make sure you have the following items ready:

  • A copy of the current Rotax Line Maintenance Manual for your engine. Whatever else follows, you should observe the requirements of this manual!
  • Three litres of suitable oil – we recommend Shell Sport Plus 4 oil as it is compatible with both unleaded and leaded fuel.
  • A Rotax approved replacement oil filter canister.
  • A fresh copper sealing ring for the oil reservoir drain plug.
  • Lock-wire and lock wire pliers.
  • A pair of side-cutters to remove old lock-wire.
  • 18mm spanner and 17mm spanner or socket to remove the oil reservoir drain plug.
  • 16mm spanner or socket to remove the magnetic plug on the side of the engine near the oil filter. NB> Older engines may have either a hex key or torx socket – check yours first!
  • Torque wrench which covers the range 25Nm
  • A suitable oil filter canister removal and replacement tool.
  • Ideally, a cutting tool to open the old oil filter to check for metal residues. If you don’t have one but know a friendly LAME or L2, they might lend you one.
  • A large container or bucket (with at least a 5 litres capacity) to collect the old oil.
  • Some kind of clean funnel to help you refill the reservoir with new oil.
  • Plenty of old rags to mop up spilt oil.

Then thoroughly warm up the engine – ideally go for a couple of circuits or a 20-minute flight – to ensure the oil is hot and fluid. Do not run the engine inside your shed/hangar!

2. Drain the oil and remove the old filter

The following actions should be completed in a timely fashion, to avoid oil draining out of the hydraulic valve lifters and oil lines. Do not drain the oil and leave (eg) overnight before refilling the next day.

  • After warming the engine, remove the top and bottom engine cowlings. Keep the cowling screws in a safe place. Take off the oil reservoir cap and ‘burp’ the engine several times to ensure all the sump oil is transferred to the reservoir.
  • Place an old oil bucket under the reservoir. Cut off and remove the drain plug lock-wire. Holding the captured nut on the reservoir with a 18mm spanner, use a 17mm spanner to loosen the drain plug. Carefully unscrew the drain plug and remove it together with its copper sealing washer. WARNING! The oil is HOT! Be careful not to drop the drain plug into the oil bucket! Allow at least 15 minutes for the oil to drain out. Remove the old copper sealing ring on the plug and replace with a new one – set the drain plug aside ready for reinstallation. DO NOT MOVE THE PROPELLER WHILE THERE IS NO OIL IN THE ENGINE!
  • While you are waiting for the oil to drain, place plenty of rags or a piece of cardboard under the oil filter to stop oil dripping on to the coolant radiator underneath. Loosen and remove the old oil filter. It contains quite a bit of oil, so remove it as quickly as you can to minimise drips etc onto the coolant radiator. Any oil on the radiator will be blown all over the engine bay when you restart the engine, so it’s important to keep it as clean as possible!
  • Cut and remove the lock-wire and unscrew the magnetic plug in the side of the engine just above the oil filter, using a 16mm spanner.

3. Inspections and records

  • Check the magnetic plug for metal accumulation per the Rotax Maintenance Manual. Some build up of metal particles is acceptable, particularly when the engine is new, as the oil lubricates the gearbox as well as the engine itself. See the Rotax manual for details of acceptable and unacceptable amounts of metal residue. Take a photo of the plug with any metal residue attached and date it for future reference in case you need it for comparison.
  • Clean up the plug with a cloth and some clean fuel and replace it – tighten to a torque of 25Nm. DO NOT OVER-TIGHTEN – remember, this is an aluminium crank case and the steel plug can damage the threads if you use too much brute force. Lock-wire the plug, making sure you replace this correctly so that the plug is held tight in the correct sense and cannot come loose!
  • Cut open the filter canister with a suitable tool and extend the paper oil filter on the bench to its full length. Carefully inspect the filter paper on both sides to identify any excessive metal residues. Check the Rotax manual for details of what is acceptable. Ideally, fold up the filter paper and keep it in a sealed and flight time/dated plastic bag in case you need it for reference at some later date.

4. Refill with new oil and install a new filter


  • Clean the oil filter contact face on the engine and install the new oil filter canister per Rotax instructions. Smear some fresh engine oil on the rubber washer/seal in the new filter and screw it back in place by hand. After tightening by hand as much as you can, further tighten the filter by rotating about 270 degrees (¾ of a turn). DO NOT OVER-TIGHTEN! Wipe away any oil spills around the bottom of the filter.
    Some people like to dab a drop of coloured paint (nail varnish is excellent for this) on the oil filter and housing so you can see at a glance if it has started to unscrew.
  • Clean the area around the oil reservoir drain and re-install the drain plug with its new copper sealer/washer. Hold the captive nut on the reservoir with a spanner and use a  torque wrench to tighten the drain plug to 25Nm. Re-lock-wire the drain plug in place. Make sure you do this correctly so that the plug is held tight in the correct sense and cannot come loose!
  • Fill the oil reservoir with 3 litres of fresh oil. Ensure the ignition is switched off and hand-crank the engine about 20 turns of the propeller (in the correct sense, never backwards!) to help refill the complete oil system. Make sure you replace the oil reservoir cap!

5. Finishing up

  • Remove and/or put away/dispose of all the old oil, filter, tools etc. Don’t replace the engine cowlings yet.
  • Pull the aircraft out of the hangar and ensure it’s well away from anything loose that might get sucked into the prop.
  • Get in and start the engine. Watch the oil pressure gauge to ensure the oil pressure is rising within 10-20 seconds. If not, shut down. Check there is oil in the reservoir. Ensure all switches including ignition, are OFF and, using the propeller blades, hand-crank the engine for 5-10 rotations of the propeller. Restart the engine and adjust to around 2300-2500 rpm.
  • If the pressure still does not rise within 10-20 seconds, shut down and carry out a full check of the oil system to ensure there are no loose hoses and that you did actually refill the oil reservoir!
  • If the pressure rises OK, run the engine for about 15 minutes at various rpm until it is well warmed through. Shut down and check for oil leaks – particularly round the oil filter, magnetic plug and reservoir drain plug.
  • If all is OK, replace the engine cowlings and you’re ready for the next flight!

Rotax 912 series oil filter – new service bulletin

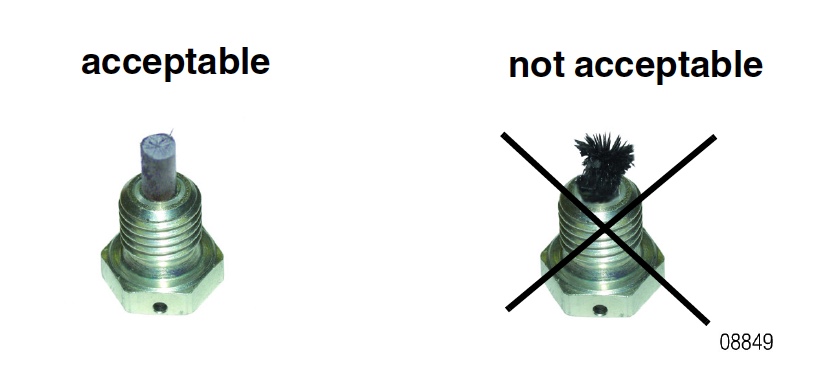
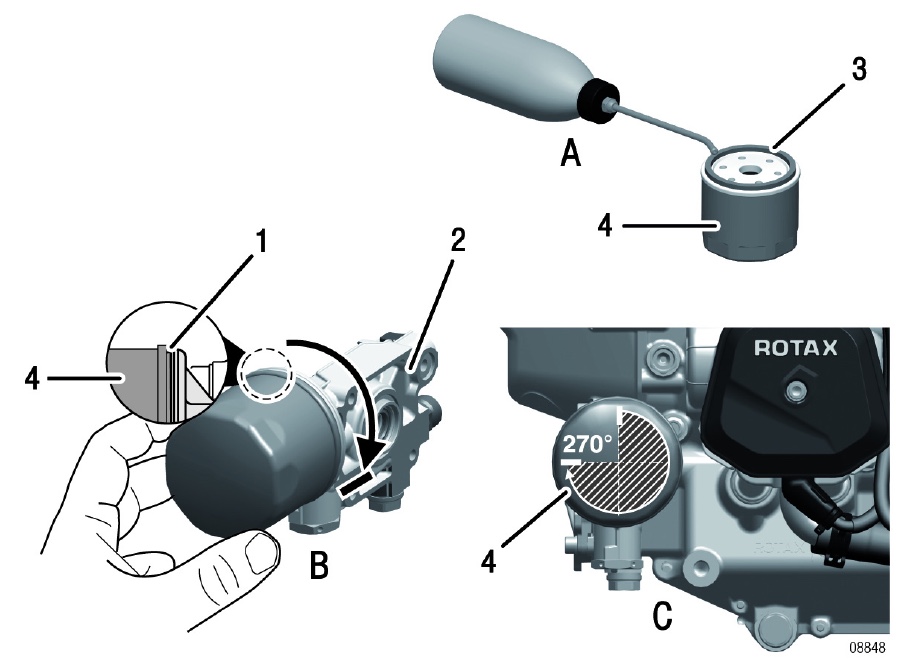
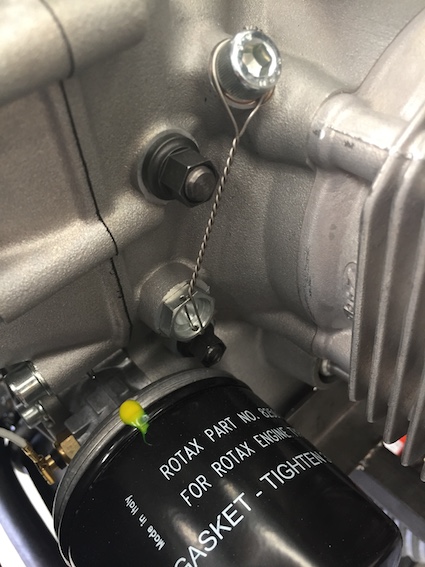
Rotax has issued a new mandatory service bulletin covering their oil filters – SB-912-071.

Due to a manufacturing deviation, the sealer gasket on the oil filter may leak, causing possible loss of oil pressure and oil.

If your 912ULS engine number is within the series from S/N 9 569 542 up to S/N 9 569 782 inclusive, or you have service replaced your oil filter since June 2017, you need to check the filter. If it has a green mark in the specified location, the filter is OK. If not, check for leakage and if any is seen, the filter must be replaced immediately. Even if there is no visible leak, the filter must also be replaced immediately on listed engines.

If there is no green mark on the filter, no leakage and the engine is not listed, the filter should be replaced within 25 engine running hours or within 200 days from 01 November 2017, whichever occurs sooner.

Here is a link to the service bulletin which gives full details: SB-912-071
Here is a link to the listed 912UL & 912ULS engines affected: SB-912-071UL

Urgent Rotax safety bulletin

Rotax has issued an urgent and mandatory service bulletin on their 912/914 series engines. It applies to a limited selection of engines built between June 2016 and October 2017 – check your Foxbat/Vixxen 912ULS engine number against the list below to see if you are affected.

(A) from S/N 6 785 971 up to S/N 6 786 198 inclusive
(B) from S/N 6 786 501 up to S/N 6 787 000 inclusive
(C) from S/N 9 569 001 up to S/N 9 569 690 inclusive
(D) from S/N 9 569 693 up to S/N 9 569 702 inclusive
PLUS S/N 9 569 823

In summary
Rotax reports that deviations in the manufacturing process of the valve push-rod assembly may cause partial wear on the rocker arm ball socket. This wear could lead to a rocker arm cracking/fracture which in consequence may lead to a malfunction of the valve train. Possible effects are rough engine running or an unusual engine operating behaviour.

The bulletin requires the removal of the rocker covers of affected engines and an inspection – and if needed, replacement – of the valve pushrods.

In simple terms, if the pushrod ends are a silver-ish colour, they are OK. If they are black they will need to be replaced.

Time frame for completion of the bulletin is:
– either at the next scheduled service
– or if a scheduled service is not due, within the next 25 hours of engine running time
– or if 25 hours running time is not completed, by 30 April 2018 at the latest

Here are links to the Bulletins:
What needs to be done: https://legacy.rotaxowner.com/si_tb_info/serviceb/sb-912-070.pdf
Which engines are affected: https://legacy.rotaxowner.com/si_tb_info/serviceb/sb-912-070ul.pdf

If you believe your engine is affected, please contact Bert Flood Imports, the Australia Rotax engine agent, for more information.
Bert Flood Imports phone number is: 03 9735 5655

Auto fuel and Rotax engines

rotax2_1Just recently, I have heard stories of rough running Rotax engines. This has been traced on several occasions to problems with the carburettors. It appears that the plastic floats in the carburettors are slowly dissolving in the fuel, causing them to become porous and cease to float! Equally dangerous, small parts of the floats are breaking off and blocking the carburettor jets. I looked at a couple of these floats and sure enough, they were soft and spongy to the touch and there were tiny pieces of black material in the bottoms of the float bowls.

Rotax recommends the use of unleaded automotive fuel – ‘mogas’ – in their 912 series engines. The fuel must have a minimum 95 octane rating for use in the 100hp 912ULS and 912iS models,.

You can also use 100LL aviation fuel – ‘avgas’ – in your 912 if you have to, but you’ll need to change the oil more frequently to help mitigate the effects of lead build up on the valves and other parts of the engine.

All fuel companies use petroleum blends to increase the octane rating of their fuels. Originally the main octane raising additive was lead but this has been phased out for automotive applications, although lead remains in use for aviation fuel. Significant octane-increasing additives in unleaded fuels include ethanol and toluene, both of which work well but they do have their limitations in some applications.

BP UltimateGenerally, the more ethanol or toluene, the more the octane rating is increased. However, this is not a golden rule and some high octane ‘low aromatic’ fuels – like BP Ultimate 98 – do not contain ethanol and have a low levels of aromatics such as toluene.

Both ethanol and toluene can affect rubber and plastic components in the fuel system. Toluene also has a high carbon content that may lead to sooty spark plugs – so don’t assume that this indicates an overly-rich mixture.

So it seems some unleaded fuels which contain substantial ethanol and/or toluene levels may be having a negative impact on plastic and rubber components in your engine!

Rotax recommends fuel with no alcohol additive for their engines but has approved the use of up to 10% ethanol in fuel. They do not mention toluene anywhere in their technical information. Your airframe manufacturer may or may not have approved the use of ethanol in any proportion. This is important to note, as the fuel tanks, fuel lines and auxiliary pumps they install could be affected.

My feeling? Stick with fuel that has no alcohol and meets at least the minimum required 95 octane for the 912ULS and 912iS engine. The higher the octane, the more likely it is to include higher levels of additives. Certainly, steer clear of any premium unleaded quoted at 100 octane or at least check if it has ethanol in the product. And maybe it’s a good idea to stick with the well known big brand name fuel distributors rather than fuels from an unknown source, that is, until we get more of a handle on the exact nature of the problem. They may be a cent or two more expensive but in my opinion, that’s a small price to pay for some peace of mind!